Spring
Spring All in One
AOP
动态代理
动态代理的缺点:
- 实现困难
- 如果没有接口,没法实现代理对象
动态代理的一般创建方法:
public class CalculateProxy {
    public static Calculator getProxy(final Calculator calculator) {
        InvocationHandler h = new InvocationHandler() {
            /**
             * 执行代理对象
             * @param proxy 代理对象 (不要动这个)
             * @param method 当前要执行的目标对象方法
             * @param args 这个方法调用时外界传入的参数值
             * @return
             * @throws Throwable
             */
            public Object invoke(Object proxy, Method method, Object[] args) throws Throwable {
//                利用反射执行目标方法
                System.out.println("动态代理执行方法....");
                Object result = method.invoke(calculator, args);
                return result;
            }
        };
        Class<?>[] interfaces = calculator.getClass().getInterfaces();
        ClassLoader loader = calculator.getClass().getClassLoader();
        Object proxy = Proxy.newProxyInstance(loader, interfaces, h);
        return (Calculator) proxy;
    }
}
接口:
public interface Calculator {
    int add(int a, int b);
    int mul(int a, int b);
    int dec(int a, int b);
    int div(int a, int b);
}
实现类:
public class MyMathCalculator implements Calculator {
    public int add(int a, int b) {
        return a + b;
    }
    public int mul(int a, int b) {
        return a * b;
    }
    public int dec(int a, int b) {
        return a - b;
    }
    public int div(int a, int b) {
        return a / b;
    }
}
测试:
@Test
public void test() {
    Calculator calculator = new MyMathCalculator();
    calculator.add(1,2);
    System.out.println("==================");
    Calculator proxy = CalculateProxy.getProxy(calculator);
    int add = proxy.add(2, 3);
    System.out.println(add);
}
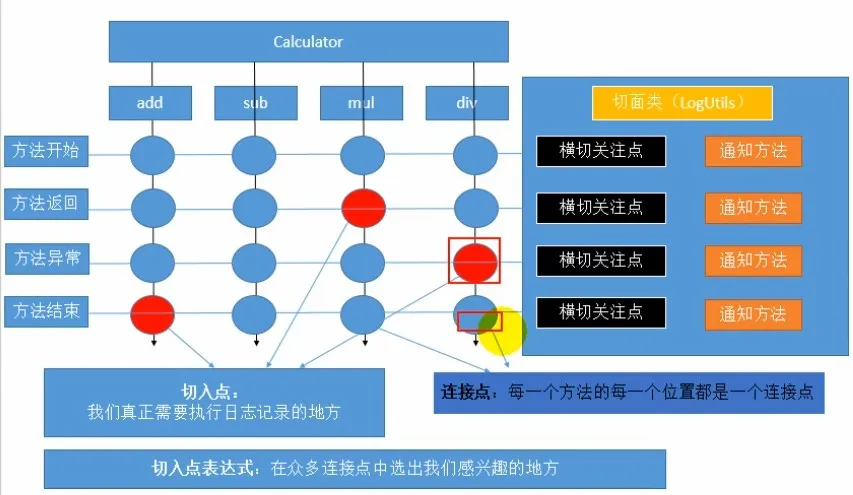
AOP的专业术语和简单使用
try{
    @Before
    method.invoke();
    @AfterReturning
} catch {
    @AfterThrowing
} fianlly {
    @After
}
AOP的五个注解:
@Before 在目标方法执行之前 -- 前置通知
@After 在目标方法执行之后 -- 后置通知
@AfterReturning 在目标方法返回之后 -- 返回通知
@AfterThrowing 在目标方法抛出异常之后 -- 异常通知
@Around 环绕 -- 环绕通知
示例:简单创建一个代理
IOC容器配置:
<?xml version="1.0" encoding="UTF-8"?>
<beans xmlns="http://www.springframework.org/schema/beans"
       xmlns:xsi="http://www.w3.org/2001/XMLSchema-instance"
       xmlns:context="http://www.springframework.org/schema/context"
       xmlns:aop="http://www.springframework.org/schema/aop"
       xsi:schemaLocation="http://www.springframework.org/schema/beans http://www.springframework.org/schema/beans/spring-beans.xsd http://www.springframework.org/schema/context http://www.springframework.org/schema/context/spring-context.xsd http://www.springframework.org/schema/aop http://www.springframework.org/schema/aop/spring-aop.xsd">
    <context:component-scan base-package="cn.zhiyucs"></context:component-scan>
<!--    开启基于注解的AOP-->
    <aop:aspectj-autoproxy></aop:aspectj-autoproxy>
</beans>
Maven加入依赖:
<dependency>
    <groupId>org.springframework</groupId>
    <artifactId>spring-aspects</artifactId>
    <version>${spring-version}</version>
</dependency>
<dependency>
    <groupId>cglib</groupId>
    <artifactId>cglib</artifactId>
    <version>3.2.5</version>
</dependency>
<dependency>
    <groupId>aopalliance</groupId>
    <artifactId>aopalliance</artifactId>
    <version>1.0</version>
</dependency>
<dependency>
    <groupId>org.aspectj</groupId>
    <artifactId>aspectjweaver</artifactId>
    <version>1.9.5</version>
</dependency>
创建一个日志工具类:@Aspect @Component
加入**@Before**....和切入点表达式(execution....)
@Aspect
@Component
public class LogUtils {
    @Before("execution(public int cn.zhiyucs.MyMathCalculator.add(int, int))")
    public static void logStart() {
//        System.out.println("["+ method.getName() +"]方法开始执行,用的参数列表:["+ Arrays.asList(args) +"]");
        System.out.println("[xxx]方法开始执行,用的参数列表:[xxx]");
    }
    @AfterReturning("execution(public int cn.zhiyucs.MyMathCalculator.*(int, int))")
    public static void logReturn() {
        System.out.println("[xxx]方法执行完成,计算结构:[xxx]");
    }
    @AfterThrowing("execution(public int cn.zhiyucs.MyMathCalculator.*(int, int))")
    public static void logException() {
        System.out.println("[xxx]方法执行异常,出现异常的信息:[xxx]");
    }
    @After("execution(public int cn.zhiyucs.MyMathCalculator.*(int, int))")
    public static void logEnd() {
        System.out.println("[xxx]方法执行完成");
    }
}
进行测试:
**注意:**注入这个类的时候必须是接口,而不是类(Calculator mcc)
@RunWith(SpringJUnit4ClassRunner.class)
@ContextConfiguration(locations = "classpath:applicationContext.xml")
public class AopTest {
    @Autowired
    ApplicationContext ioc;
//    如果想要用类型,一定要用它的接口,不要用它的类!!
    @Autowired
    Calculator mcc;
    @Test
    public void test() {
        mcc.add(1, 2);
也可以使用非接口的AOP:cglib帮助我们创建好了代理对象
@Service
public class MyMathCalculator/* implements Calculator*/ {...
    @Autowired
    MyMathCalculator mcc;
    @Test
    public void test() {
        mcc.add(1, 2);
//        cglib帮助我们创建好了代理对象
        System.out.println(mcc.getClass()); //class cn.zhiyucs.MyMathCalculator$$EnhancerBySpringCGLIB$$ac796d0b
    }
AOP的另一些细节
切入点表达式的通用写法
原来的写法:
@Before("execution(public int cn.zhiyucs.MyMathCalculator.add(int, int))")
匹配一个或这个字符:
@Before("execution(public int cn.zhiyucs.MyMath*.*(int, int))")
匹配任意一个参数:(..)
@Before("execution(public int cn.zhiyucs.MyMath*.*(..))")
匹配任意路径:包名..
@Before("execution(public int cn.zhiyucs..MyMath*.*(..))")
权限位置可以不写(public):
@Before("execution(* cn.zhiyucs..MyMath*.*(..))")
最终版本:
@Before("execution(* cn.zhiyucs.*.*(..))")
获取方法的信息
使用的包:org.aspectj.lang.JoinPoint;
获取参数:JoinPoint jp -- jp.getArgs
获取一个方法名:JoinPoint jp -- getSignature -- getName
    @Before("execution(* cn.zhiyucs.*.*(..))")
    public static void logStart(JoinPoint jp) {
//        System.out.println("["+ method.getName() +"]方法开始执行,用的参数列表:["+ Arrays.asList(args) +"]");
//        运行时参数
        Object[] args = jp.getArgs();
//        获取方法签名
        Signature signature = jp.getSignature();
        String name = signature.getName();
        System.out.println("[" + name + "]方法开始执行,用的参数列表:[" + Arrays.asList(args) + "]");
    }
获取结果值和获取抛出异常的信息:在切入点表达式之后加入returning / throwing
//    需要告诉spring result要接收返回值
    @AfterReturning(value = "execution(public int cn.zhiyucs.MyMathCalculator.*(int, int))",
            returning = "result")
    public static void logReturn(JoinPoint jp, Object result) {
        Signature signature = jp.getSignature();
        String name = signature.getName();
        System.out.println("["+ name +"]方法执行完成,计算结果:["+result+"]");
    }
    @AfterThrowing(value = "execution(public int cn.zhiyucs.MyMathCalculator.*(int, int))",
        throwing = "e")
    public static void logException(JoinPoint jp, Exception e) {
        Signature signature = jp.getSignature();
        String name = signature.getName();
        System.out.println("["+ name +"]方法执行异常,出现异常的信息:["+e+"]");
    }
切入点表达式的重用
    @Pointcut("execution(* cn.zhiyucs.*.*(..))")
    public void pt1() {}
    @Before("pt1()")
    public static void logStart(JoinPoint jp) {
    ...
    }
环绕通知
    /**
     * 环绕通知:动态代理
     * 环绕通知中ProceedingJoinPoint 相当于 JoinPoint
     * 环绕通知优于普通通知执行
     * [普通前置]
     * {
     *     环绕前置
     *     环绕执行:目标方法
     *     环绕返回/出现异常
     *     环绕后置
     * }
     * [普通方法返回/方法异常]
     * [普通后置]
     */
    @Around("pt1()")
    public Object myAround(ProceedingJoinPoint pjp) throws Throwable {
        Object[] args = pjp.getArgs();
//        利用反射进行目标方法的调用,相当于method.invoke(obj, args)
        Signature signature = pjp.getSignature();
        String name = signature.getName();
        Object proceed = null;
        try {
            System.out.println("【环绕前置通知】【"+name+"】方法开始, 方法参数: "+ Arrays.asList(pjp.getArgs()));
            proceed = pjp.proceed(args);
            System.out.println("【环绕返回通知】【"+name+"】方法返回【"+proceed+"】");
        }catch (Exception e) {
            System.out.println("【环绕异常通知】【"+name+"】方法发生异常,异常信息:"+e);
        } finally {
            System.out.println("【环绕后置通知】【"+name+"】方法结束");
        }
        System.out.println("环绕....");
        return proceed;
    }
注意:
- 执行顺序:环绕前置 -- 普通前置 -- 目标方法执行 -- 环绕开始返回/出现异常 -- 环绕后置 -- 普通后置 -- 普通返回/异常
- 环绕通知如果发生异常,外边的普通通知是接收不到的,需要throw new 抛出去,普通通知才能捕获到
多切面的执行顺序
如果不使用任何注解:执行切面的顺序是按大小写字母A-Z执行
如果使用**@Order(value="")** value值越小,优先级越高
基于XML的AOP
基于注解的AOP步骤:
- 将目标类和切面加入到容器中。@Component
- 告诉Spring哪个是切面类。@Aspect
- 在切面类中使用五个通知注解配置切面中的这些通知方法都何时何地运行
<!--    将目标类和切面加入到容器中。@Component-->
    <bean class="cn.zhiyucs.MyMathCalculator" id="myMathCalculator"></bean>
    <bean class="cn.zhiyucs.LogUtils" id="logUtils"></bean>
<!--    AOP名称空间-->
    <aop:config>
<!--        告诉Spring哪个是切面类。@Aspect-->
        <aop:pointcut id="pt1" expression="execution(* cn.zhiyucs.*.*(..))"/>
        <aop:aspect ref="logUtils"  order="1">
            <!--在切面类中使用五个通知-->
            <aop:before method="logStart" pointcut-ref="pt1"></aop:before>
            <aop:after-returning method="logReturn" pointcut-ref="pt1" returning="result"></aop:after-returning>
            <aop:after-throwing method="logException" pointcut-ref="pt1" throwing="e"></aop:after-throwing>
            <aop:after method="logEnd" pointcut-ref="pt1"></aop:after>
        </aop:aspect>
    </aop:config>
注解和配置的区别:
- 注解:快速
- 配置:共嫩更完善
重要的用配置,不重要的注解
IOC
Spring第一个程序
在maven文件导入:
<properties>
    <spring-version>5.1.3.RELEASE</spring-version>
</properties>
<dependencies>
    <dependency>
        <groupId>org.springframework</groupId>
        <artifactId>spring-beans</artifactId>
        <version>${spring-version}</version>
    </dependency>
    <dependency>
        <groupId>org.springframework</groupId>
        <artifactId>spring-context</artifactId>
        <version>${spring-version}</version>
    </dependency>
    <dependency>
        <groupId>org.springframework</groupId>
        <artifactId>spring-core</artifactId>
        <version>${spring-version}</version>
    </dependency>
    <dependency>
        <groupId>org.springframework</groupId>
        <artifactId>spring-expression</artifactId>
        <version>${spring-version}</version>
    </dependency>
    <dependency>
        <groupId>commons-logging</groupId>
        <artifactId>commons-logging</artifactId>
        <version>1.2</version>
    </dependency>
    <dependency>
        <groupId>junit</groupId>
        <artifactId>junit</artifactId>
        <version>4.12</version>
        <scope>test</scope>
    </dependency>
</dependencies>
新建一个实体类:
public class Person {
    private String lastName;
    private Integer age;
    private String gender;
    private String email;
...
}
新建一个配置文件到resource下:
<?xml version="1.0" encoding="UTF-8"?>
<beans xmlns="http://www.springframework.org/schema/beans"
       xmlns:xsi="http://www.w3.org/2001/XMLSchema-instance"
       xsi:schemaLocation="http://www.springframework.org/schema/beans http://www.springframework.org/schema/beans/spring-beans.xsd">
<!--    注册person对象-->
<!--    一个bean可以注册一个组件-->
    <bean id="person" class="cn.zhiyucs.bean.Person">
<!--        property为person属性赋值-->
        <property name="lastName" value="张三"></property>
        <property name="age" value="18"></property>
        <property name="email" value="zhangsan@zhiyucs.com"></property>
        <property name="gender" value="男"></property>
    </bean>
</beans>
可以开始测试这个类:
public class IOCTest {
//        从容器中拿到这个组件
    @Test
    public void testPerson() {
        ApplicationContext ioc = new ClassPathXmlApplicationContext("/ioc.xml");
        Person person = (Person)ioc.getBean("person");
        System.out.println(person);
    }
}
小结:
- 同一组件在ioc容器时单实例的,容器启动完成都已经创建准备好的
- ioc容器在创建对象的时候(property)会利用setter方法为JavaBean属性进行赋值
- JavaBean的属性名是由getter/setter方法决定属性名,setLastName -> lastName
Spring多个对象赋值和构造器赋值
【序言】一般都是使用name+value的方式进行赋值
多个对象赋值方式
如果XML是多个对象
<bean id="person" class="cn.zhiyucs.bean.Person">
<!--        property为person属性赋值-->
    <property name="lastName" value="张三"></property>
    <property name="age" value="18"></property>
    <property name="email" value="zhangsan@zhiyucs.com"></property>
    <property name="gender" value="男"></property>
</bean>
<bean id="person02" class="cn.zhiyucs.bean.Person">
    <!--        property为person属性赋值-->
    <property name="lastName" value="李四"></property>
    <property name="age" value="22"></property>
    <property name="email" value="lisi@zhiyucs.com"></property>
    <property name="gender" value="男"></property>
</bean>
可以通过这样赋值:
<T> T getBean(String name, Class<T> requiredType) throws BeansException;
@Test
public void test02() {
    Person person02 = ioc.getBean("person02", Person.class);
    System.out.println(person02);
    Person person03 = ioc.getBean("person", Person.class);
    System.out.println(person03);
}
通过构造器赋值
Bean类中加入构造器
public Person() {
}
public Person(String lastName, Integer age, String gender) {
    this.lastName = lastName;
    this.age = age;
    this.gender = gender;
}
public Person(String lastName, Integer age, String gender, String email) {
    this.lastName = lastName;
    this.age = age;
    this.gender = gender;
    this.email = email;
}
如果是四个参数的构造器:
<bean id="person03" class="cn.zhiyucs.bean.Person">
<!--        调用有参构造器-->
    <constructor-arg name="lastName" value="小明"></constructor-arg>
    <constructor-arg name="age" value="12"></constructor-arg>
    <constructor-arg name="email" value="xiaoming@zy.com"></constructor-arg>
    <constructor-arg name="gender" value="男"></constructor-arg>
</bean>
如果想不添加name,可以添加index属性
<!--    省略name需要严格按照构造器-->
<bean id="person04" class="cn.zhiyucs.bean.Person">
    <constructor-arg value="小花"></constructor-arg>
    <constructor-arg value="18"></constructor-arg>
    <constructor-arg value="xiaohua@zy.com" index="3"></constructor-arg>
    <constructor-arg value="男" index="2"></constructor-arg>
</bean>
如果是三个参数构造器需要添加type,不然会为最后一个参数赋值
<bean id="person05" class="cn.zhiyucs.bean.Person">
    <constructor-arg value="小李"></constructor-arg>
    <constructor-arg value="16" type="java.lang.Integer"></constructor-arg>
    <constructor-arg value="女"></constructor-arg>
</bean>
Spring命名空间
在xml导入 p 命名空间
<?xml version="1.0" encoding="UTF-8"?>
<beans xmlns="http://www.springframework.org/schema/beans"
       xmlns:xsi="http://www.w3.org/2001/XMLSchema-instance"
       xmlns:p="http://www.springframework.org/schema/p" //这里
       xsi:schemaLocation="http://www.springframework.org/schema/beans http://www.springframework.org/schema/beans/spring-beans.xsd">
使用p标签快速构建bean
<bean id="person06" class="cn.zhiyucs.bean.Person"
      p:age="16"
      p:lastName="p"
      p:email="p@qq.com"
      p:gender="女">
</bean>
Spring正确赋值各种属性
创建一些复杂的属性
public class Person {
//    基本类型
//    <property name="lastName" value="张三"></property>
    private String lastName;
    ....
//    复杂类型
    private Car car;
    private List<Book> books;
    private Map<String, Object> maps;
    private Properties properties;
    ....
}
赋值为NULL的方法和引用类的配置
<bean id="person" class="cn.zhiyucs.bean.Person">
    <!--    使用null值,默认就是Null-->
    <property name="lastName">
        <null></null>
    </property>
    <!--这里是引用类的配置-->
    <property name="car" ref="car01"></property>
</bean>
<bean class="cn.zhiyucs.bean.Car" id="car01">
    <property name="carName" value="宝马"></property>
    <property name="price" value="30000"></property>
    <property name="color" value="绿色"></property>
</bean>
进行内部bean赋值的配置
<bean id="person" class="cn.zhiyucs.bean.Person">
    <!--    使用null值,默认就是Null-->
    <property name="lastName">
        <null></null>
    </property>
    <!--        <property name="car" ref="car01"></property>-->
    <property name="car">
        <bean class="cn.zhiyucs.bean.Car">
            <property name="carName" value="奔驰"></property>
            <property name="price" value="100000"></property>
            <property name="color" value="白色"></property>
        </bean>
    </property>
</bean>
赋值一个List集合的范例:
<bean id="complex_person" class="cn.zhiyucs.bean.Person">
    <property name="books">
        <list>
            <!-- list标签 -->
            <bean id="innerBook" class="cn.zhiyucs.bean.Book"
                  p:bookName="西游"
                  p:author="吴承恩">
            </bean>
            <!--  引用  -->
            <ref bean="book01" />
        </list>
    </property>
</bean>
<!--  引用类型Book  -->
<bean id="book01" class="cn.zhiyucs.bean.Book"
      p:bookName="水浒传"
      p:author="施耐庵">
</bean>
**注意:**如果要获取innerBook是获取不到的,使用IOC的getBean是获取不到内部id,只能内部使用
为Map类型赋值:
<bean id="complex_person" class="cn.zhiyucs.bean.Person">
    <property name="maps">
        <map>
            <entry key="key01" value="张三"></entry>
            <entry key="key02" value="17"></entry>
            <entry key="key03" value-ref="book01"></entry>
            <entry key="key04">
                <bean class="cn.zhiyucs.bean.Car">
                    <property name="carName" value="宝马"></property>
                </bean>
            </entry>
        </map>
    </property>
    <bean id="book01" class="cn.zhiyucs.bean.Book"
        p:bookName="水浒传"
        p:author="施耐庵">
    </bean>
</bean>
为Properties赋值
<property name="properties">
    <props>
        <!--                K V都是sring,可以直接写到标签体-->
        <prop key="username">root</prop>
        <prop key="password">123456</prop>
    </props>
</property>
util命名空间引入,进行全局引用:
首先更改头文件
<?xml version="1.0" encoding="UTF-8"?>
<beans xmlns="http://www.springframework.org/schema/beans"
       xmlns:xsi="http://www.w3.org/2001/XMLSchema-instance"
       xmlns:p="http://www.springframework.org/schema/p"
       xmlns:util="http://www.springframework.org/schema/util" // 这里
       xsi:schemaLocation="http://www.springframework.org/schema/beans
       http://www.springframework.org/schema/beans/spring-beans.xsd
       http://www.springframework.org/schema/util                        // 这里
       http://www.springframework.org/schema/util/spring-util-4.0.xsd">  // 这里
创建并引用
<bean id="new_person" class="cn.zhiyucs.bean.Person">
    <property name="maps" ref="myMap"></property>
</bean>
<!--    相当于new LinkedHashMap()-->
<util:map id="myMap">
    <!--        添加元素-->
    <entry key="key01" value="张三"></entry>
    <entry key="key02" value="17"></entry>
    <entry key="key03" value-ref="book01"></entry>
    <entry key="key04">
        <bean class="cn.zhiyucs.bean.Car">
            <property name="carName" value="宝马"></property>
        </bean>
    </entry>
</util:map>
级联,修改属性的属性:xxx.xxx
<!--    级联-->
    <bean class="cn.zhiyucs.bean.Person" id="person03">
<!--        如果使用ref会产生级联 car01的price也会随着改变-->
        <property name="car" ref="car01"></property>
        <property name="car.price" value="90000"></property> //这里
    </bean>
其他属性的赋值
属性继承:关键属性 --- parent
<bean id="person04" class="cn.zhiyucs.bean.Person">
    <property name="lastName" value="张三"></property>
    <property name="age" value="19"></property>
    <property name="gender" value="男"></property>
    <property name="email" value="zhangsan@zhiyucs.com"></property>
</bean>
<bean id="person05" class="cn.zhiyucs.bean.Person" parent="person04">
    <property name="lastName" value="李姐"></property>
</bean>
打印结果:
Person{lastName='张三', age=19, gender='男', email='zhangsan@zhiyucs.com', car=null, books=null, maps=null, properties=null}
Person{lastName='李姐', age=19, gender='男', email='zhangsan@zhiyucs.com', car=null, books=null, maps=null, properties=null}
抽象:关键属性 ---abstract
<!--    abstract:不能获取它的实例,只能被用来继承-->
    <bean id="person04" class="cn.zhiyucs.bean.Person" abstract="true">
        <property name="lastName" value="张三"></property>
        <property name="age" value="19"></property>
        <property name="gender" value="男"></property>
        <property name="email" value="zhangsan@zhiyucs.com"></property>
    </bean>
bean之间的依赖:(基本不用)
<!--    原来的创建顺序是依次的-->
<!--    depends-on决定创建顺序-->
    <bean id="person" class="cn.zhiyucs.bean.Person"></bean>
    <bean id="car" class="cn.zhiyucs.bean.Car" depends-on="person,book"></bean>
    <bean id="book" class="cn.zhiyucs.bean.Book"></bean>
【重点】Bean的作用域:单实例和多实例
prototype 多实例
- 容器启动默认不会去创建多实例bean
- 获取的时候创建这个bean
- 每次获取都会创建一个新的对象
singleton 单实例
- 在容器启动完成就已经创建好对象, 保存在容器中
- 任何时候都是获取之前创建好的对象
<bean id="book" class="cn.zhiyucs.bean.Book" scope="prototype"></bean>
使用工厂创建对象
静态工厂:
public class StaticFactory {
    public static AirPlane getAirPlane(String jzName) {
        AirPlane airPlane = new AirPlane();
        airPlane.setFdj("太行");
        airPlane.setFjsName("lfy");
        airPlane.setJzName(jzName);
        airPlane.setPersonNum(300);
        airPlane.setYc("198.98m");
        return airPlane;
    }
}
factory-method属性里指定该工厂方法的名称
使用 construtor-arg 元素为工厂方法传递方法参数
<!--    静态工厂-->
<bean id="airplane01" class="cn.zhiyucs.factory.StaticFactory" factory-method="getAirPlane">
    <constructor-arg value="张三"></constructor-arg>
</bean>
实例工厂:
public class InstanceFactory {
    public AirPlane getAirPlane(String jzName) {
        AirPlane airPlane = new AirPlane();
        airPlane.setFdj("太行");
        airPlane.setFjsName("lfy");
        airPlane.setJzName(jzName);
        airPlane.setPersonNum(300);
        airPlane.setYc("198.98m");
        return airPlane;
    }
}
<bean id="instanceFactory" class="cn.zhiyucs.factory.InstanceFactory">
</bean>
<bean id="airplane02" class="cn.zhiyucs.factory.InstanceFactory" factory-bean="instanceFactory" factory-method="getAirPlane">
    <constructor-arg value="李四"></constructor-arg>
</bean>
根据接口创建
public class MyFactoryBeanImpl implements FactoryBean<Book> {
    /**
     * 工厂方法,创建对象
     * @return
     * @throws Exception
     */
    public Book getObject() throws Exception {
        Book book = new Book();
        book.setBookName(UUID.randomUUID().toString());
        return book;
    }
    /**
     * 返回对象的类型
     * @return
     */
    public Class<?> getObjectType() {
        return Book.class;
    }
    /**
     * 是否单例
     * @return
     */
    public boolean isSingleton() {
        return false;
    }
}
<bean class="cn.zhiyucs.factory.MyFactoryBeanImpl" id="myFactoryBean"></bean>
Bean的生命周期方法和后置处理器
Bean的声明周期方法
补充对象:
public class Book {
    private String author;
    private String bookName;
    public void myInit() {
        System.out.println("这是图书的初始化方法");
    }
    public void myDestory() {
        System.out.println("这是图书的销毁方法");
    }
    public Book() {
        System.out.println("图书被创建");
    }
    ...
}
XML配置
<!--    destroy-method自定义销毁方法-->
<bean id="book1" class="cn.zhiyucs.bean.Book" destroy-method="myDestory"></bean>
测试方法:
public class IOCTest {
    ConfigurableApplicationContext ioc = new ClassPathXmlApplicationContext("applicationContext.xml");
    @Test
    public void test01() {
        ioc.close();
    }
}
后置处理器
拿Book的实体类为例:
创建一个后置处理器:
public class MyBeanPostProcessor implements BeanPostProcessor {
    /**
     * 初始化之前调用
     * @param bean 将要初始化的bean
     * @param beanName bean名字(id)
     * @return
     * @throws BeansException
     */
    public Object postProcessBeforeInitialization(Object bean, String beanName) throws BeansException {
        System.out.println("【"+ beanName +"】将要调用初始化方法...");
        return bean;
    }
    /**
     * 初始化之后调用
     * @param bean
     * @param beanName
     * @return
     * @throws BeansException
     */
    public Object postProcessAfterInitialization(Object bean, String beanName) throws BeansException {
        System.out.println("【"+ beanName +"】将要调用初始化方法2...");
        return bean;
    }
}
XML配置
<!--    destroy-method自定义销毁方法-->
    <bean id="book1" class="cn.zhiyucs.bean.Book" destroy-method="myDestory" init-method="myInit"></bean>
<!--    后置处理器-->
    <bean class="MyBeanPostProcessor" id="myBeanPostProcessor"></bean>
测试结果:
图书被创建
【book1】将要调用初始化方法...
这是图书的初始化方法
【book1】将要调用初始化方法2...
这是图书的销毁方法
单实例:数据库连接池
需要额外导入两个Jar
<dependency>
    <groupId>mysql</groupId>
    <artifactId>mysql-connector-java</artifactId>
    <version>5.1.6</version>
</dependency>
<dependency>
    <groupId>c3p0</groupId>
    <artifactId>c3p0</artifactId>
    <version>0.9.1.2</version>
</dependency>
在IOC中配置:
<bean class="com.mchange.v2.c3p0.ComboPooledDataSource" id="dataSource">
    <property name="user" value="root"></property>
    <property name="password" value="root"></property>
    <property name="jdbcUrl" value="jdbc:mysql://localhost:3306/eesy"></property>
    <property name="driverClass" value="com.mysql.jdbc.Driver"></property>
</bean>
测试及结果:
@Test
public void test02() throws SQLException {
    //        DataSource dataSource = ioc.getBean("dataSource", DataSource.class);
    DataSource dataSource = ioc.getBean(DataSource.class);
    System.out.println(dataSource.getConnection());
}
七月 04, 2020 11:43:53 上午 com.mchange.v2.log.MLog <clinit>
信息: MLog clients using java 1.4+ standard logging.
七月 04, 2020 11:43:53 上午 com.mchange.v2.c3p0.C3P0Registry banner
信息: Initializing c3p0-0.9.1.2 [built 21-May-2007 15:04:56; debug? true; trace: 10]
七月 04, 2020 11:43:53 上午 com.mchange.v2.c3p0.impl.AbstractPoolBackedDataSource getPoolManager
信息: Initializing c3p0 pool... com.mchange.v2.c3p0.ComboPooledDataSource [ acquireIncrement -> 3, acquireRetryAttempts -> 30, acquireRetryDelay -> 1000, autoCommitOnClose -> false, automaticTestTable -> null, breakAfterAcquireFailure -> false, checkoutTimeout -> 0, connectionCustomizerClassName -> null, connectionTesterClassName -> com.mchange.v2.c3p0.impl.DefaultConnectionTester, dataSourceName -> 1hgegoxab6myo681osor89|30a3107a, debugUnreturnedConnectionStackTraces -> false, description -> null, driverClass -> com.mysql.jdbc.Driver, factoryClassLocation -> null, forceIgnoreUnresolvedTransactions -> false, identityToken -> 1hgegoxab6myo681osor89|30a3107a, idleConnectionTestPeriod -> 0, initialPoolSize -> 3, jdbcUrl -> jdbc:mysql://localhost:3306/eesy, maxAdministrativeTaskTime -> 0, maxConnectionAge -> 0, maxIdleTime -> 0, maxIdleTimeExcessConnections -> 0, maxPoolSize -> 15, maxStatements -> 0, maxStatementsPerConnection -> 0, minPoolSize -> 3, numHelperThreads -> 3, numThreadsAwaitingCheckoutDefaultUser -> 0, preferredTestQuery -> null, properties -> {user=******, password=******}, propertyCycle -> 0, testConnectionOnCheckin -> false, testConnectionOnCheckout -> false, unreturnedConnectionTimeout -> 0, usesTraditionalReflectiveProxies -> false ]
com.mchange.v2.c3p0.impl.NewProxyConnection@157632c9
把IOC的配置提取到单独的文件:
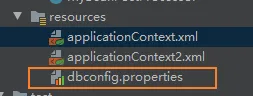
username=root
password=root
jdbcUrl=jdbc:mysql://localhost:3306/eesy
driverClass=com.mysql.jdbc.Driver
需要引入context:
使用context的property-placeholder.location属性
<?xml version="1.0" encoding="UTF-8"?>
<beans xmlns="http://www.springframework.org/schema/beans"
       xmlns:xsi="http://www.w3.org/2001/XMLSchema-instance"
       xmlns:context="http://www.springframework.org/schema/context" //这里
       xsi:schemaLocation="http://www.springframework.org/schema/beans http://www.springframework.org/schema/beans/spring-beans.xsd http://www.springframework.org/schema/context https://www.springframework.org/schema/context/spring-context.xsd">
<!--    classpath表示引用类路径下文件-->
    <context:property-placeholder location="classpath:dbconfig.properties"/>
    <bean class="com.mchange.v2.c3p0.ComboPooledDataSource" id="dataSource">
        <property name="user" value="${username}"></property>
        <property name="password" value="${password}"></property>
        <property name="jdbcUrl" value="${jdbcUrl}"></property>
        <property name="driverClass" value="${driverClass}"></property>
    </bean>
</beans>
XML的自动装配和SqEL
自动装配
<!--  autowire 自动装配(仅限于对自定义类型的属性有效)
        default 不自动装配
        byName
        byType
        constructor
-->
<bean class="cn.zhiyucs.bean.Car" id="car">
    <property name="carName" value="宝马"></property>
    <property name="color" value="白色"></property>
</bean>
<bean class="cn.zhiyucs.bean.Person" id="person" autowire="byType"></bean>
<bean class="cn.zhiyucs.bean.Book" id="book1">
    <property name="author" value="吴承恩"></property>
    <property name="bookName" value="西游记"></property>
</bean>
<bean class="cn.zhiyucs.bean.Book" id="book2">
    <property name="author" value="施耐庵"></property>
    <property name="bookName" value="水浒传"></property>
</bean>
SpEL表达式
<!--    SpEl(Spring Expression Language)-->
<bean id="person04" class="cn.zhiyucs.bean.Person">
    <!--        字面量: ${} #{}-->
    <property name="age" value="#{ 12 * 5 }"></property>
    <property name="salary" value="#{ 12345.67 * 12 }"></property>
    <property name="lastName" value="#{ book1.bookName }"></property>
    <property name="car" value="#{ car }" ></property>
    <!--    静态调用的语法规则-->
    <!--    UUID.randomUUID().toString()-->
    <!--    #{T(全类名).静态方法名()}-->
    <property name="email" value="#{T(java.util.UUID).randomUUID().toString().substring(0,5)}"></property>
    <!--       非静态方法:对象.方法名 -->
    <property name="gender" value="#{book2.getBookName()}"></property>
</bean>
通过注解创建@Cotroller @Service @Repository
Maven加入AOP
<dependency>
    <groupId>org.springframework</groupId>
    <artifactId>spring-aop</artifactId>
    <version>${spring-version}</version>
</dependency>
IOC配置文件加入自动扫描注解
<!--    Spring自动扫描
            component-scan: 指定扫描的基础包. 把基础包及它下面的所有加了注解自动扫描进ico容器
-->
    <context:component-scan base-package="cn.zhiyucs"></context:component-scan>
如果需要排除某些类:
    <context:component-scan base-package="cn.zhiyucs">
<!--        type
                annotation 注解
                assignable 具体的类(全类名)
                aspectj aspectj表达式
                custom 自定义个TypeFilter
                regex 正则表达式
-->
<!--        <context:exclude-filter type="annotation" expression="org.springframework.stereotype.Repository"/>-->
        <context:include-filter type="annotation" expression="org.springframework.stereotype.Controller"/>
    </context:component-scan>
例如Controller组件:
@Controller
public class BookServlet {
}
也可以修改在IOC容器的名字:
@Controller("bookController")
@Scope("prototype") //修改为多例
public class BookServlet {
}
使用它
@Autowired
private BookDao bookDao;
@Test
public void test() {
    System.out.println(bookDao);
}
Spring依赖注入(DI)
@Autowired
private BookServlet bookServlet;
@Test
public void test() {
    System.out.println(bookServlet);
}
@Autowired原理
bookServiceExt和bookService关系:
public class BookServiceExt extends BookService
先按照类型去容器找到对应的组件:
BookService bookService = ioc.getBean("bookService", BookService.class);
找到一个:找到赋值;
没找到:抛出异常;
找到多个:按照变量名作为ID继续匹配:bookService(把Class的一个首字母小写放入ioc)、bookServiceExt
匹配上:第一个 -- bookService,如果使用变量bookServiceExt则使用 -- bookServiceExt
没匹配上:报错
- 因为按照变量名继续匹配
- 可以使用**@Qualifier("bookServiceExt")**
@Controller
public class BookServlet {
    @Qualifier("bookServiceExt")
    @Autowired
    private BookService bookServiceExt2;
    public void doGet() {
        bookServiceExt2.save();
    }
}
在形参上注入和使用Qualifier
    @Autowired
    public void saveDao(BookDao bookDao,@Qualifier("bookServiceExt") BookService bookService) {
        System.out.println(bookDao);
    }
@Resource和@Autowired的区别:
@Resource的扩展性更强,是Java的标准,如果切换到另外一个框架,这个注解依然能用
@Autowired是Spring独有的依赖注入注解
Spring单元测试
不用Spring单元测试: 需要使用ioc.getBean来获取组件
public class IOCTest {
    ApplicationContext ioc = new ClassPathXmlApplicationContext("applicationContext.xml");
    @Test
    public void test() {
        BookServlet bookServlet = ioc.getBean(BookServlet.class);
        bookServlet.doGet();
    }
}
**好处:**不用ioc.getBean()获取组件,Spring直接使用@Autowired自动装配
//@RunWith 指定用哪种驱动进行单元测试,默认是junit
@RunWith(SpringJUnit4ClassRunner.class)
@ContextConfiguration(locations = "classpath:applicationContext.xml") //指定配置文件
public class SpringTest {
    ApplicationContext ioc = null;
    @Autowired
    private BookServlet bookServlet;
    @Test
    public void test() {
        bookServlet.doGet();
    }
}
Spring泛型依赖注入
Dao层
public abstract class BaseDao<T> {
    public abstract void save();
}
@Repository
public class BookDao extends BaseDao<Book> {
    @Override
    public void save() {
        System.out.println("书籍保存");
    }
}
@Repository
public class UserDao extends BaseDao<User> {
    @Override
    public void save() {
        System.out.println("用户保存");
    }
}
Service层
public class BaseService<T> {
    @Autowired
    BaseDao<T> baseDao;
    public void save() {
        baseDao.save();
    }
}
@Service
public class BookService extends BaseService<Book>{
}
@Service
public class UserService extends BaseService<User>{
}
测试:
@RunWith(SpringJUnit4ClassRunner.class)
@ContextConfiguration(locations = "classpath:applicationContext.xml")
public class SpringTest {
    @Autowired
    ApplicationContext ioc;
    @Autowired
    private BookService bookService;
    @Autowired
    private UserService userService;
    @Test
    public void test() {
        bookService.save();
        userService.save();
    }
}
结果:
七月 04, 2020 3:27:20 下午 org.springframework.test.context.support.AbstractTestContextBootstrapper getDefaultTestExecutionListenerClassNames
信息: Loaded default TestExecutionListener class names from location [META-INF/spring.factories]: [org.springframework.test.context.web.ServletTestExecutionListener, org.springframework.test.context.support.DirtiesContextBeforeModesTestExecutionListener, org.springframework.test.context.support.DependencyInjectionTestExecutionListener, org.springframework.test.context.support.DirtiesContextTestExecutionListener, org.springframework.test.context.transaction.TransactionalTestExecutionListener, org.springframework.test.context.jdbc.SqlScriptsTestExecutionListener]
七月 04, 2020 3:27:20 下午 org.springframework.test.context.support.AbstractTestContextBootstrapper getTestExecutionListeners
信息: Using TestExecutionListeners: [org.springframework.test.context.support.DirtiesContextBeforeModesTestExecutionListener@3a03464, org.springframework.test.context.support.DependencyInjectionTestExecutionListener@2d3fcdbd, org.springframework.test.context.support.DirtiesContextTestExecutionListener@617c74e5]
书籍保存
用户保存